
It’s your first overseas snow trip and you have chosen the very popular Whistler Blackcomb. Day three is coming to an end and you’re making your way down the slope. Easily, the best run of your day; there have been no falls and you’ve even managed to get a little air time coming over one of the rollers. Suddenly, you look up and there it is.
Now all those who have been fortunate enough to ski at WB before will know what I’m talking about when I mention the traverse at the very bottom of Blackcomb Mountain. For a beginner snowboarder on men's snowboards, it is hell. It’s long, narrow, and I have seen billiard
tables with more of a downslope than this thing.
You’re thinking to yourself, “Nah, I’ve got this, I am speed”, you straighten up at the bottom of the connecting run and begin to gain speed. The wind is flying off your body, you are absolutely cooking. You’ll be at Longhorns in no time sinking the first of many beers for the evening. Then tragedy strikes. Your board starts acting strange; you’re dropping pace, fast. It starts to grab the snow, almost like someone is behind you, yanking your board and pulling you in the opposite direction.
You’re now at a speed that would be appropriate for the turtle setting on your ride-on mower back home. You look left, then right. A flock of children no older than eight and no heavier than your left leg fly past you, chuckling at you because they know you haven’t even made it halfway. They disappear into the distance; you’ve now almost come to a complete stop. That beer might be a little further away than you first anticipated. You un-strap, move to the side of the run and begin walking.
You can’t work out where it all went wrong, one second you were on the verge of breaking the sound barrier and the next you’re getting laughed at by borderline infants yelling “Go back to the valley, you kook!” You look over your shoulder and spot what seems to be a group of locals, gliding with ease over the area which just took your entire momentum hostage. As they cruise past you, a girl with a Canadian accent shouts “should have waxed your board bud!” A light bulb goes off in your head and you remember your friend who you borrowed the board off mention something about it needing a wax, but being a beginner it wasn’t going to matter that much, right? This guide will tell you all about why tuning is so important, whether it's for men's skis, women's skis, men's snowboards or women's snowboards.
What's Involved in Ski and Snowboard Maintenance
Why Tune?
Usually the first question when informing a customer they need a tune is, “why?” The short answer, you don’t. You don’t need one in the sense that your car doesn’t need a tune, or your clothes don’t need washing. However, similar to the examples above, it’s best if you do. Regular tuning and upkeep on your equipment, for example, men's and women's skis, will both enhance the performance immensely as well as increase the life span of said gear.
Keep your gear in good working order and your day on the hill will be a thousand times easier and safer.
1. Less energy needed and lower risk of accidents
Professional edge grinding ensures uncompromising grip even in icy slope conditions. This saves energy and increases safety.
2. Easier to turn and glide
Optimum structured base ensures the perfect "turning moment" and smooth easy gliding in all snow conditions. Together they create a feeling on the slopes which you'll never want to be without again!
So now that I’ve answered the question and convinced you it’s necessary from my fantastic analogy, let’s move onto the how and when.
 |
Before
|
 |
After
|
How to Properly Tune Your Gear
There’s really only two options when it comes to the how, that is professionally, where there are many loud machines, the air smells of dark roasted coffee and technical words like dampening and extruded are being thrown around casually. The other option is the home job, you in your underwear, listening to your favourite Bowie album on a Saturday afternoon trying to remember if the lady at the shop said to use the red or the green wax. Both will get the job done but generally getting the people that get paid to do it is the better option. (If you’re keen to give the more simplistic aspects of tuning a go, I’ve attached a step by step guide on how to wax!)
So you have just purchased your brand new set of skis or snowboard and have been on your trip...What’s next? Equipment maintenance is like maintaining your car; it is important to put them in for a service, “tune”, regularly.
If you have just come back from a trip and notice that your equipment has surface scratches, high or low points on the base, dull edges, or perhaps even rust on your edges, it is time for a tune.
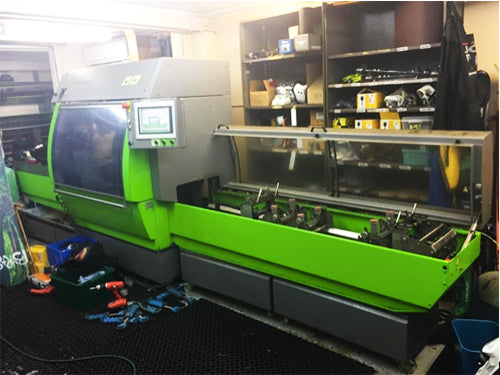
Professional Tuning with the Wintersteiger Machine
A tune on our Wintersteiger Tuning Machine repairs your base and gets rid of any of those surface scratches, it puts structure back into your base, sharpens your edges, and even includes a wax and scrape. It's amazing value to get your equipment back to near new quality for your next trip.
What is structure? Structure in your base acts as pores to absorb the wax, it also creates micro channels to help break the friction between your base and the snow to help you slide faster. So now you can see why you would want to ensure that your base is in the best condition for you to shred the gnar and not get stuck on those flat spots.
Sometimes, especially when skiing in Australia or New Zealand, we can damage our equipment a little more than we would like. Gauges, core shots, other base damage, top sheet damage, or rail damage will incur some extra costs depending on how bad the damage is; our friendly staff will be able to recommend the best path to correcting the damage. If the damage is minor we can give you a quote on the spot, however sometimes the board has to be assessed by our senior technicians. In this case we will get our technician to call you to have a chat about the damage, give you a quote, and get the go ahead to complete the job.
We are fortunate enough to have the only Wintersteiger tuning machine in the Southern Hemisphere. If you’re thinking of grabbing one for home, it’ll only set you back roughly a quarter million doubloons and you’ll also need a part time mechanic for the maintenance on it. It is a technical piece of machinery that is designed to precisely grind the base of a pair of men's skis or snowboards whilst simultaneously sharpening the edges. Sharp edges are an absolute must when on-piste skiing. It is what gives you your grip on the snow and without them you’d be slipping all over the place. This is achieved by several passes in and out of the machine with regular inspections to ensure the desired result is being reached.
Each ski and board is completely different as far as the camber and profile is concerned so no two jobs are the same. If the ski that goes into the machine is in relatively good shape with no major damage, the final product will be that of a base that is practically brand new.

The stone that grinds the base also leaves a structure throughout. This allows the wax in the later stages to flow along and creates channels for the snow to pass through; essentially making it ride better than a ski/board straight off the shelf. Whilst grinding the edges, it leaves them with a 2-degree bevel which is critical in a well-performing piece of snow equipment Without this bevel, ‘catching edges’ would be a whole lot more common, and for those who have been in the game a while, you’ll know that it isn’t an ideal situation.
Repairing Base Scars and Imperfections
Depending on what state your equipment is in, it may need more than just a few passes through the Wintersteiger. The most common problem seen with customer’s equipment coming in is scars on the base. Easily accomplished on the mountain, (especially in the bottom half of the world with our abundance of rocks throughout our mountains) but will require a bit of TLC to get it back to its former glory. A scar is basically just a gouge on the bottom of a ski or board. If you do a good enough job you can even get to the core of it! If these are left untreated and a decent amount of riding is continued to be done, you run the risk of waterlogging your equipment. This is when water leaks into the core of the board/ski, dampening the wood, ultimately ruining it. Unfortunately, once this happens, there is no return.
If you manage to score yourself a core shot, it’s best to get it fixed as soon as possible. The longer you ride on it, the higher risk you have of ruining it. How is it fixed? We have thin sticks of what is called P-Tex, it is a soft plastic with a low-temperature burn that is super flexible and designed to bind with the base of said thrashed gear. We simply light it and slowly drag it over the scar, ensuring all gaps are filled.

We keep the flame blue so smoke is kept to a minimum resulting in no soot getting into the repair. Once it has been left for a while to cool, we then take a special file, file it down as smooth as possible, then it goes straight into the Wintersteiger. Once it comes out we then move onto waxing then scraping (you’ll find a thorough guide on how it all works below). Our goal is to hand it back to the customer and play the game, “try and find where the scar was.”
Much like in the introduction scenario in this post, a lot of people are unaware of the importance of ski and snowboard upkeep, as well as the advantages/disadvantages associated with it. We're here to help with that.
Ski & Snowboard Damage
After each day of skiing or riding you should thoroughly inspect your equipment for wear or damage, things to look out for are:
Dull, Rounded Edges
Dull, rounded edges or damage such as nicks or burrs. If your edges are worn your ski/board will want to continually slip out from under you while making turns, Dull edges will no longer grip the snow helping you carve your turns. Worn edges can be particularly hard to ski/ride on firm or icy snow conditions. Using WINTERSTEIGER side edge tools combined with either diamond stones or files, you can quickly bring back that new ski feel with a few simple steps. The base edge can only be sharpened at your local WINTERSTEIGER repair shop, any work you do at home to the base edge will only increase the base edge bevel.
Damage to the Base
When inspecting your equipment also look for damage to the base such as scratches or deep gouges. Even small scratches can impede glide and can lead to more damage if not repaired. WINTERSTEIGER Drip Candles are the easiest way to repair scratches and damage to the base on skis and snowboards. Deep gouges, which penetrate to the core, or run along the steel edges need to be repaired by a qualified WINTERSTEIGER repair shop.
Dry Base
As you ski/ride the wax wears from the base due to friction and will leave it with a dry, fuzzy, gray appearance. By applying a fresh coat of wax you will refresh the base and improve the glide while conditioning it against oxidation. WINTERSTEIGER offers high-quality wax irons, temperature specific waxes, wax scrapers and brushes to keep the base in top condition. The wax will wear quickly, especially on dry snow and should be re-applied after every 2 to 4 days of use. When you take your equipment into your nearest WINTERSTEIGER repair shop, they will apply wax as part of the repair service.
When to Schedule Your Ski and Snowboard Tune-Up
So, knowing how everything works now, I’m sure the question in your mind is “when do I need to get my gear tuned?” Our recommendation is regular tuning, immediately after every trip if you’re going away for a couple weeks; once or twice a year. Living in Australia, generally a snow trip takes quite a bit of planning and financing to happen. With this is mind, the last thing you want is to finally get to the slopes after twenty plus hours of travelling and have something underneath you that can’t hold an edge, is grabbing the snow every ten metres, and is just no fun to ride in general. There isn’t really a down side to a regular tune except for the cost of it, but in the grand scheme of things, the amount of money and effort you’ve spent getting to the snow, what’s an extra eighty dollars for a Dakine Quick Tune Kit to ensure you have something on your feet that is going to be fun to ride?
Post-Trip Maintenance and Waxing

Why after my trip, not before? Two reasons. The first being that when you aren’t using your gear, it needs to have a storage wax on it. This stops the base drying out and protects it from dust / dirt getting into the all-important structure. The second: chances are you’ll have a lot of things to do before going on your holiday. If you get your gear serviced when you get back from your trip it’s one less thing to worry about. All you need to do is get that storage wax scraped off and you’re good to go!
Preparing Your Gear for Storage
Coming back from your trip and your equipment is still tip top? Don’t leave it for 6 - 12 months in our Australian heat, get a storage wax put on your equipment! Why? Australia is pretty hot and I am willing to bet 90% of us have an air con in our house, which means that wherever you are storing your equipment, it is likely to be in an area where the temperature fluctuates significantly. If you don’t put a storage wax on your equipment, the base will dry out, your edges will get rusted and you will probably be up for a larger repair bill when it comes time for your next trip; you also won’t be ready for your trip and that sucks! A storage wax hydrates the base of your board and protects your edges from rusting, so win win for anyone. At Snowcentral a wax and scrape means you get a premium quality Molybdenum (Moly) wax, scrape, and polish at a very reasonable price.
Those folks, are the ins and outs of what exactly is entailed in the maintenance of your skis or snowboards. Sometimes it isn’t necessary, but if you want to maximise the chance of having the most fun possible on a large hill covered in snow, it really does pay off to look after your gear and get it regularly serviced. Below you’ll find a step by step guide on how to wax your equipment at home!
Waxing Your Ski and Snowboard at Home
Remembering back to our poor friend from earlier, who is probably still walking; waxing is a big deal. It has three general intentions, which are: base protection, friction reduction (increased glide) and cleaning (dirt rejection). A freshly waxed surface paired with regular touch-ups will have your ski/board gliding across the snow like a hot knife through butter.
The base needs to be clean! If you plan on waxing your equipment at home without a machine tune, the base needs to be as clean as possible. As mentioned, skis/boards will usually have a structure throughout the base. This can become filled with dirt that needs to be cleaned out, otherwise the wax job will be somewhat pointless. The best way to do this is with a brass brush. Start at the nose of your ski/board, firmly stroke down towards the tail (nose to tail direction only) several times and clean the lifted dirt off with a cloth or kitchen paper. Do this for the entire length of your equipment and keep going until you are satisfied that the structure is free of anything but air.
Choosing the Right Wax Type
Next is choosing the right type of wax. The type of wax you use is completely reliant on where you are going and at what time of year. The wax you would use for a week in Australia, mid-September, is structured completely different to one you would use in Northern British Columbia at the height of winter. Now to get technical for a second, everyone starts with a hydrocarbon wax. This is the most basic of waxes. Recreational skiers will use this alone; racers and high-performance seekers will use wax with additives.
Hydrocarbon waxes
Primarily made up of three types of hydrocarbons: paraffin, microcrystalline, and synthetic waxes that are combined together in various proportions. Paraffin is a soft, candle-like wax that has low coefficients of friction allowing the ski to glide easily over the snow crystals. Microcrystalline waxes are a branched type of hydrocarbon that are more durable than paraffin as they do not strip off as fast. Synthetic waxes are slightly branched hydrocarbons that also make the wax stronger.
Molybdenum (moly) or graphite additive
The molybdenum additive counteracts electrostatic effects that slow you in cold, dry snow; it also repels dirt in warm snow. Molybdenum is better than graphite, and considered a speed additive as well.
Fluorocarbon additives
Fluorine is very hydrophobic, meaning that it repels water molecules. Fluorocarbons give increased glide in moist and wet snow conditions by reducing the attraction between the water and the base.
Now, all that can be simplified to a far more user-friendly solution: colours. Generally, most makers of snow wax out there will stick to the same colour guide to help you choose the right wax for your next snow destination.

Temperature rating numbers are for snow temperature, not the air temperature. For hydrocarbon wax there are 3 basic types:
Warm rated (Red) hydrocarbon is best above -4⁰C it is a great wax to ski on but is also used for conditioning a new base.
Cold rated (Green) hydrocarbon is best below -4⁰C. Combined with the red it makes a complete wax system for most skiers.
Universal all-temperature (White/Black) hydrocarbon is a good one-wax system for non-racers. It is the hardest of the three waxes and better in the ultra-cold than the green hydrocarbon wax. At temperatures above freezing the wax will work, but not as well as the red hydrocarbon wax.
If you do ski in the ultra-cold or ski very aggressively and you tend to get dryness in your bases (especially under the bindings) you may want to consider wax cycles of a temperature appropriate hydrocarbon blended with either moly of fluoro wax.
Now that the board is clean and we’ve got the correct colour wax in our hand, it’s time to take this solid bar and turn it into a nice thin glaze over your base. The way that this is achieved is with an iron. No, not the iron from your laundry, because when the next person goes to iron their brand-new shirt before a night out on the town and gets a giant waxed imprint of the iron base on the front of their shirt, they won’t be happy (speaking from experience here). No, you need a proper iron designed for turning wax bars into wax droplets to go on ski equipment. The best option is to buy a wax iron kit that will come with everything you need to complete the job.
Step-by-Step Guide for Waxing Skis and Snowboards

Now that you’ve got all the tools it’s time to get waxing! The best method is to start at one end of your ski/board, place the bar of wax against the iron and wait for it to start to drip. When it does, try to do a snake-like drip pattern from one end to the other until you’ve got a nice, even coverage. Once you’ve done that, we can start to spread it around. Having an even spread of wax over is crucial, as you don’t want one area to have less than another. This will cause one area to become drier and will affect the overall performance of the wax.
Waxing for Skiers
Skiers, your job is a lot easier. All you need to do is hold the iron horizontally, start at the tail and do one long pass all the way to the nose. Have the iron slightly angled towards you so the trailing edge of the iron is doing most of the work. After completing the first pass, you want to be able to just see the outline of the dots, the reason being that if you melt all the wax completely on the first pass, the second will put too much heat into the ski and the wax will bubble, reducing its effectiveness. So, in saying that, the second pass you go back in the opposite direction, nose to tail. This time you want all the remaining outlines of the dots gone and a nice smooth even spread. Do that for both skis and double-check you haven’t missed any areas. If it’s all covered, then you’re done!
Waxing for Snowboarders

Snowboarders, your job is slightly more difficult. Again, start at the tail, line up one edge of the iron (horizontally) with the edge of your snowboard, and whilst tilting the iron slightly towards you so, again, the trailing edge is doing the work also apply more pressure with your thumb closest to the edge. What this does is push the wax towards the edges of the board which is the area to be focused on the first pass. Do that all the way to the nose and repeat on the other side of the board (tail to nose). After doing the first two passes you should have to even strips down both edges of the board, and a gap running through the middle. Now once more tail to nose, go through the middle that has been missed so all areas have had one pass. Finally, the last two passes are exactly the same as the first two, just instead the opposite way (nose to tail), with the iron on that trailing edge but no need to focus the edges with that thumb pressure as they will already be covered. One last pass down the centre of the board to get that thin strip through the middle that may have been missed. Your board is now waxed!
It is important to follow the tail to nose for the first passes, then nose to tail for the final passes. This is because of the structure in the base of the board and the way it’s positioned. The final passes from nose to tail really push the wax into the structure, maximising effectiveness. Which brings me to my next point, and arguably the worst part about waxing your own gear: scraping.
The Art of Proper Scraping
Scraping is simply taking away the excess wax off your equipment so most of it only remains inside that structure you cleaned the dirt out of earlier. A scraper is generally a rectangular piece of plastic with somewhat sharp edges. Try to avoid scraping immediately after you’ve just finished waxing; the longer the wax stays on, the better, as it has time to work its way into the ski/board’s structure fully. But if you’re strapped for time, leaving it overnight is fine. To scrape your gear, start at the - yes, you guessed it - nose, and work down towards the tail. Let the scraper do most of the work. If you press down too hard you can scrape through the wax and into the base, possibly damaging your prized possession, especially with a brand-new scraper! Be diligent throughout the scraping and try to be thorough. If you go out onto the slopes with big patches of wax still on your skis or board, it will ball up on the bottom and can do more harm than good.
When you think you have removed the majority of wax, simply take the scraper and drag it from the nose to the tail. If you feel the scraper grab or slow down, chances are there’s still excess wax in the area and a few more light scrapes should get rid of it. The last step is getting a micro-fibre cloth and giving it a good rub (nose to tail). This will give it a nice clean finish and can also reveal some sneaky bits of excess wax you may have missed with the scraper.
Note: If you’re putting your gear to rest for an extended period of time, skip the scraping stage. Leave the wax on as a storage wax.
Ready to purchase your skis and snowboards? See Snowcentral's range of skis and snowboards to pick the best gear for your trip.


